UI Component
While the app grows, we might want to reuse the UI to keep the codes DRY. In this lesson, we'll go deeper to make reusable chat UI components.
Time to accomplish: 15 minutes
Building Component
Let's continue creating the todos list UI. But this time, we'll build it in a customized JSX Component.
First add this type that represent the todo data:
//...
export type Todo = {
  id: number;
  name: string;
};
Then create a src/components/TodoList.tsx file with the following content:
- Messenger
- Telegram
- LINE
import Sociably from '@sociably/core';
import * as Messenger from '@sociably/messenger/components';
import { Todo } from '../types';

type TodoListProps = {
  todos: Todo[];
};

const TodoList = ({ todos }: TodoListProps, { platform }) => {
  if (todos.length === 0) {
    return <p>You have no todo now.</p>;
  }

  const summary = <p>You have <b>{todos.length}</b> todos:</p>;
  const finishLabel = 'Done ✓';

  if (platform === 'messenger') {
    return (
      <>
        {summary}
        <Messenger.GenericTemplate>
          {todos.slice(0, 10).map((todo) => (
            <Messenger.GenericItem
              title={todo.name}
              buttons={
                <Messenger.PostbackButton
                  title={finishLabel}
                  payload={JSON.stringify({ action: 'finish', id: todo.id })}
                />
              }
            />
          ))}
        </Messenger.GenericTemplate>
      </>
    );
  }

  return (
    <>
      {summary}
      {todos.map((todo) => <p>{todo.name}</p>)}
    </>
  );
};

export default TodoList;
import Sociably from '@sociably/core';
import * as Telegram from '@sociably/telegram/components';
import { Todo } from '../types';

type TodoListProps = {
  todos: Todo[];
};

const TodoList = ({ todos }: TodoListProps, { platform }) => {
  if (todos.length === 0) {
    return <p>You have no todo now.</p>;
  }

  const summary = <p>You have <b>{todos.length}</b> todos:</p>;
  const finishLabel = 'Done ✓';

  if (platform === 'telegram') {
    return (
      <>
        {summary}
        {todos.slice(0, 10).map((todo) => (
          <Telegram.Text
            replyMarkup={
              <Telegram.InlineKeyboard>
                <Telegram.CallbackButton
                  text={finishLabel}
                  data={JSON.stringify({ action: 'finish', id: todo.id })}
                />
              </Telegram.InlineKeyboard>
            }
          >
            {todo.name}
          </Telegram.Text>
        ))}
      </>
    );
  }

  return (
    <>
      {summary}
      {todos.map((todo) => <p>{todo.name}</p>)}
    </>
  );
};

export default TodoList;
import Sociably from '@sociably/core';
import * as Line from '@sociably/line/components';
import { Todo } from '../types';

type TodoListProps = {
  todos: Todo[];
};

const TodoList = ({ todos }: TodoListProps, { platform }) => {
  if (todos.length === 0) {
    return <p>You have no todo now.</p>;
  }

  const summary = <p>You have <b>{todos.length}</b> todos:</p>;
  const finishLabel = 'Done ✓';

  if (platform === 'line') {
    return (
      <>
        {summary}
        <Line.CarouselTemplate
          altText={todos.map((todo) => todo.name).join('\n')}
        >
          {todos.slice(0, 10).map((todo) => (
            <Line.CarouselItem
              actions={
                <Line.PostbackAction
                  label={finishLabel}
                  data={JSON.stringify({ action: 'finish', id: todo.id })}
                />
              }
            >
              {todo.name}
            </Line.CarouselItem>
          ))}
        </Line.CarouselTemplate>
      </>
    );
  }

  return (
    <>
      {summary}
      {todos.map((todo) => <p>{todo.name}</p>)}
    </>
  );
};

export default TodoList;
The component can then be used in the handleChat like:
import TodoList from '../components/TodoList';
// ...
  if (action.type === 'list') {
    return reply(
      <TodoList
        todos={[
          { id: 1, name: 'Buy a mask' },
          { id: 2, name: 'Wear it on' },
          { id: 3, name: 'Be safe' },
        ]}
      />
    );
  }
// ...
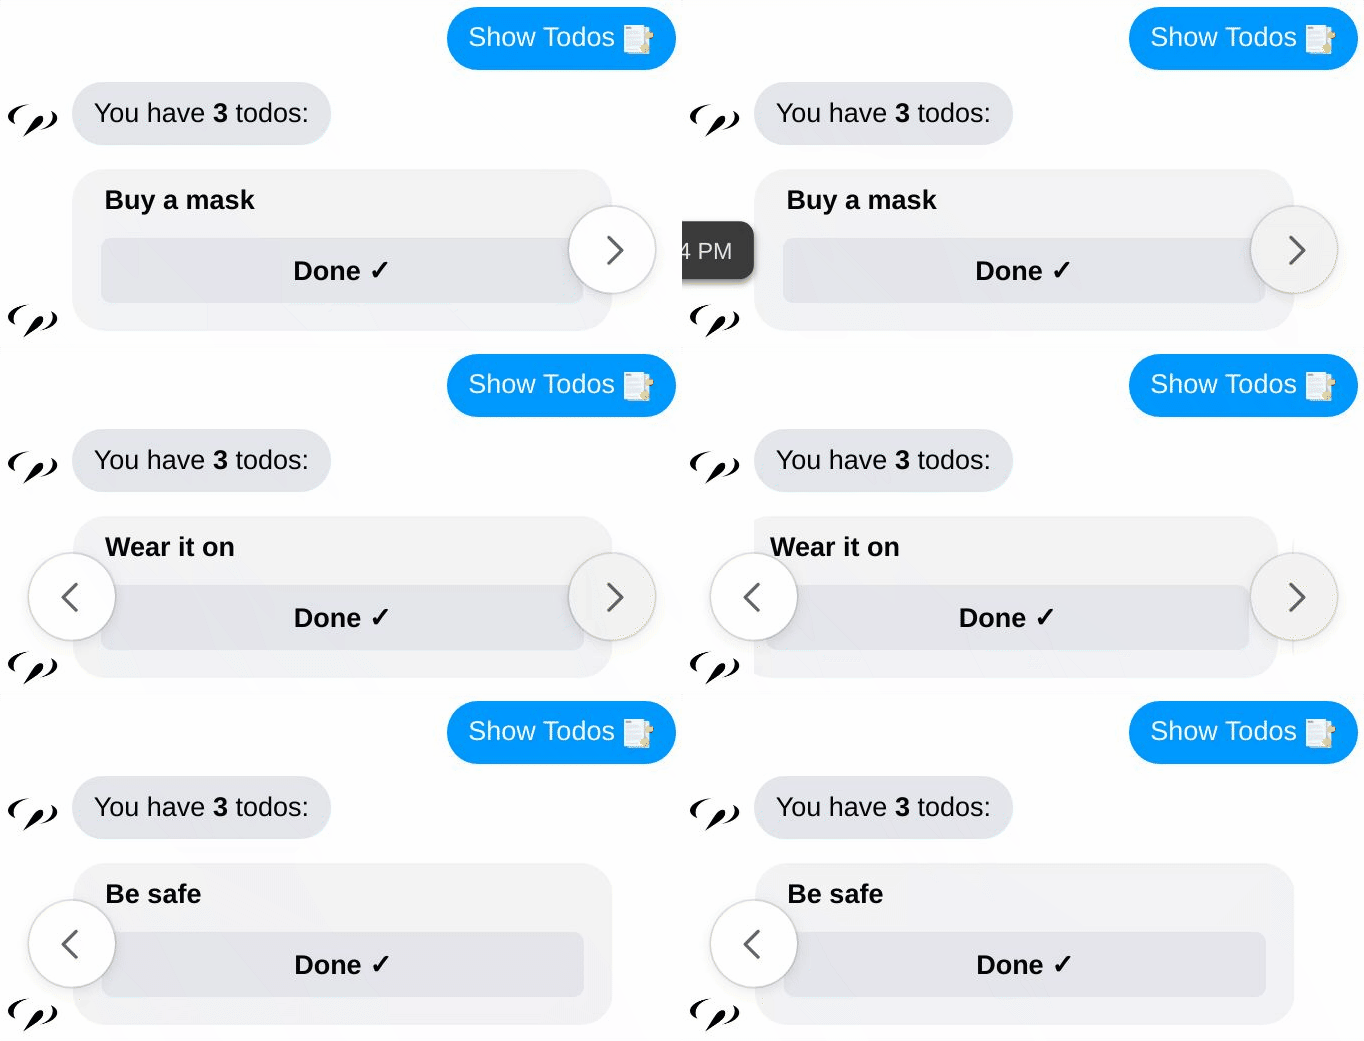
Now tap the Show Todos 📑 button again, the bot should reply like:

The
Done ✓button post back a'finish'action with the todo id, we will handle that at the next lesson.
The Component Function
A component is a function with capitalized name. We can use it as the JSX element tag like:
<TodoList todos={[{ id: 1, name: 'foo' }, /* ... */]} />
The first param is the props of the JSX element.
TodoList function receives a { todos: [/* ... */] } object.
Then we can use the todos to return the UI:
  return (
    <>
      {summary}
      {todos.map((todo) => <p>{todo.name}</p>)}
    </>
  );
Insert an Array
To display the todos list, we can insert an array of elements in JSX.
The {todos.map(todo => <p>{todo.name}</p>)} code above actually
shows the same result as:
<>
  <p>{todo[1].name}</p>
  <p>{todo[2].name}</p>
  <p>{todo[3].name}</p>
</>
Cross-Platform Component
To customize messages for the platform,
we can return the UI according to platform at the second param.
Like:
const TodoList = ({ todos }: TodoListProps, { platform }) => {
  // ...
  if (platform === 'messenger') {
    return (
      // messenger UI element
    );
  }
  // ...
At the end of the function, we can return a general UI as the default message:
  // ...
  return (
    <>
      {summary}
      {todos.map((todo) => <p>{todo.name}</p>)}
    </>
  );
};
With this strategy, we can make a component that works on all the platforms.
The Children Prop
Another common strategy is wrapping around the children of the element. Let's use it to make a menu component.
Edit src/components/WithMenu.tsx component like this:
- Messenger
- Telegram
- LINE
//...
type WithMenuProps = {
  children: SociablyNode;
  todoCount: number;
};

const WithMenu = ({ children, todoCount }: WithMenuProps, { platform }) => {
  const info = <>You have <b>{todoCount}</b> todos now.</>;
  const listLabel = 'Show Todos 📑';
  const listData = JSON.stringify({ action: 'list' });
  const addLabel = 'New Todo ➕';
  const addData = JSON.stringify({ action: 'add' });

  if (platform === 'messenger') {
    return (
      <>
        {children}
        <Messenger.ButtonTemplate
          buttons={
            <>
              <Messenger.PostbackButton
                title={listLabel}
                payload={listData}
              />
              <Messenger.PostbackButton
                title={addLabel}
                payload={addData}
              />
            </>
          }
        >
          {info}
        </Messenger.ButtonTemplate>
      </>
    );
  }

  return (
    <>
      {children}
      <p>{info}</p>
    </>
  );
};
//...
//...
type WithMenuProps = {
  children: SociablyNode;
  todoCount: number;
};

const WithMenu = ({ children, todoCount }: WithMenuProps, { platform }) => {
  const info = <>You have <b>{todoCount}</b> todos now.</>;
  const listLabel = 'Show Todos 📑';
  const listData = JSON.stringify({ action: 'list' });
  const addLabel = 'New Todo ➕';
  const addData = JSON.stringify({ action: 'add' });

  if (platform === 'telegram') {
    return (
      <>
        {children}
        <Telegram.Text
          replyMarkup={
            <Telegram.InlineKeyboard>
              <Telegram.CallbackButton
                text={listLabel}
                data={listData}
              />
              <Telegram.CallbackButton
                text={addLabel}
                data={addData}
              />
            </Telegram.InlineKeyboard>
          }
        >
          {info}
        </Telegram.Text>
      </>
    );
  }

  return (
    <>
      {children}
      <p>{info}</p>
    </>
  );
};
//...
//...
type WithMenuProps = {
  children: SociablyNode;
  todoCount: number;
};

const WithMenu = ({ children, todoCount }: WithMenuProps, { platform }) => {
  const info = <>You have <b>{todoCount}</b> todos now.</>;
  const listLabel = 'Show Todos 📑';
  const listData = JSON.stringify({ action: 'list' });
  const addLabel = 'New Todo ➕';
  const addData = JSON.stringify({ action: 'add' });

  if (platform === 'line') {
    return (
      <>
        {children}
        <Line.ButtonTemplate
          altText={`You have ${todoCount} todos now.`}
          actions={
            <>
              <Line.PostbackAction
                label={listLabel}
                displayText={listLabel}
                data={listData}
              />
              <Line.PostbackAction
                label={addLabel}
                displayText={addLabel}
                data={addData}
              />
            </>
          }
        >
          {info}
        </Line.ButtonTemplate>
      </>
    );
  }

  return (
    <>
      {children}
      <p>{info}<p/>
    </>
  );
};
//...
Then we can use it in handleChat like this:
import WithMenu from '../components/WithMenu';
//...
    if (event.type === 'text') {
      const matchingAddTodo = event.text.match(/add(\s+todo)?(.*)/i);

      if (matchingAddTodo) {
        const todoName = matchingAddTodo[2].trim();
        return reply(
          <WithMenu todoCount={3}>
            <p>Todo "<b>{todoName}</b>" is added!</p>
          </WithMenu>
        );
      }
    }

    return reply(
      <WithMenu todoCount={3}>
        <p>Hello! I'm a Todo Bot 🤖</p>
      </WithMenu>
    );
  };
//...
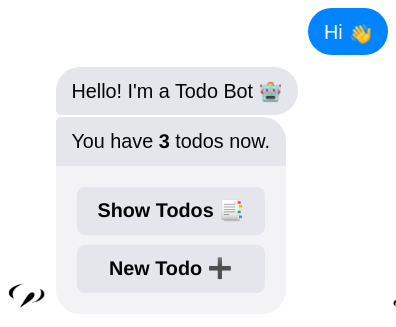
Now the menu should be attached like this:

In the codes above, we pass messages to the WithMenu component like:
<WithMenu todoCount={3}>
  <p>Hello! I'm a Todo Bot 🤖</p>
</WithMenu>
The <p>Hello! I'm a Todo Bot 🤖</p> is then available as children
prop in component function. We can simply return it with the menu attached
below. Like:
  return (
    <>
      {children}
      <Messenger.ButtonTemplate
        buttons={<>...</>}
      >
        {info}
      </Messenger.ButtonTemplate>
    </>
  );
You can use this strategy to elegantly decorate the messages, like attaching a greeting, a menu or a feedback survey.
Now we know how to build complicated, cross-platform and reusable chat UI in components. Next, we'll display these UI with real data.